Lab 1: Karel the Robot
Lab 1: Programming Karel
First, open Snap with Karel, in a new tab or window so that you can do the lab exercises and continue reading these instructions at the same time.
Slow to load?
Loading the page can take some time - anywhere from 20 seconds to 5 minutes. Exactly how long it takes depends on which browser you’re using and the computer you’re on. We recommend using an up-to-date version of the chromium (chrome) browser, but we have tested Snap! also with firefox and Internet Explorer.
If the browser shows a message like “a script on this page has stopped responding”, and asking you whether to “Stop script” or “Continue”, choose “Continue”. (This may happen several times.)
Getting Karel ready to go
Before you can start Karel, or do run any program, you have to
initialise the grid and robot:
Click the  block. A green highlight
appears around the edges of the block while it is run. (Setup can also
take some time, up to a minute. If you don’t see the setup block at the
top of the work area, click the Karel icon in the lower right area.)
After that, you can start Karel by clicking the
block. A green highlight
appears around the edges of the block while it is run. (Setup can also
take some time, up to a minute. If you don’t see the setup block at the
top of the work area, click the Karel icon in the lower right area.)
After that, you can start Karel by clicking the
 block, and then
move him around by clicking the two movement blocks.
block, and then
move him around by clicking the two movement blocks.
Exercise 1.1
In the first lecture, we showed you how to add a new “block” that made Karel turn right (clockwise). You can find this block, as well as Karel’s basic actions, in the “Motion” category of blocks.
If you want to see how “Turn Karel right” works, right-click on it and select “edit”: an editor with the definition of the block will show up.
Now, create a new block that uses Karel’s basic actions (moving forward, turning left) to make him move as if he had taken one step backwards.
To create a new block, click on “Make a block” (in the “Variables” category). A window pops up where you can name the new block (call it “Move Karel backward”) and select its type (“Command”) and what category it should be placed in (“Motion” would be the right choice).
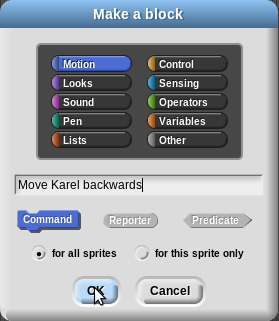
Click “Ok”.
This opens an editor for the new block. Create it by dragging in appropriate blocks from the collections on the left (you may find the blocks you need in different categories). When done, click “Apply” or “Ok” and the block appears in the category where you placed it. (Blocks in the “Other” category, coloured grey, appear in the “Variables” tab.)
Test your new block!
Testing (and testing, and testing again) is the key to creating correct software. To test the block, drag a copy of it into the work area, and click on it: this will run the block. You can compose it with other blocks, for example to make Karel walk forwards and then backwards again.
Saving and loading blocks
After you have created some blocks that may be useful in future
labs, you may want to save them. (Starting from next week, you
will also need to save blocks so that you can submit your
assignment for marking.)
To do this, click the  button,
and select “Export blocks”. This opens a window where you can
select which blocks to save. The default is to save all custom
blocks, which is probably more than you want so you will have to
deselect some. After you’ve made your selection, press “Ok” and the
browser will open a new tab (or window) with a description of
your chosen blocks. To save it, use your browsers “Save as”
function (usually found by right-clicking, or in the “File” menu).
button,
and select “Export blocks”. This opens a window where you can
select which blocks to save. The default is to save all custom
blocks, which is probably more than you want so you will have to
deselect some. After you’ve made your selection, press “Ok” and the
browser will open a new tab (or window) with a description of
your chosen blocks. To save it, use your browsers “Save as”
function (usually found by right-clicking, or in the “File” menu).
If you want to see an example of how it’s done, here is a video (click on the last icon at the bottom to watch at full screen, click on the link to watch the larger version on youtube website).
Exercise 1.2
Now for something slightly more challenging. Click the
 to
change Karel’s world to one that has some “hurdles” sticking
up from the bottom wall. We want to make Karel move along
the bottom wall, crossing each hurdle that he encounters.
To solve the problem, begin by breaking it down into small
parts, such as:
to
change Karel’s world to one that has some “hurdles” sticking
up from the bottom wall. We want to make Karel move along
the bottom wall, crossing each hurdle that he encounters.
To solve the problem, begin by breaking it down into small
parts, such as:
- Move Karel forwards until he is in front of a wall.
- Make Karel follow a wall (on his right) until it ends.
- Make Karel go over a hurdle, and back down to the bottom wall.
Make a block for each part. You should find that the first two are useful in constructing the third.
Finally, make Karel traverse the whole obstacle course. How do you make him stop when he has reached the bottom-right corner?
Exercise 1.3
Karel wakes up, not knowing where he is (or which way he is facing)! In one (and only one) of the corners of the grid, there is a beeper. How can he get to it?
To put Karel in this precarious situation, use the block
!["[tell (karel) reset_random] followed by [Turn Karel on]"](https://artofcomputing.cecs.anu.edu.au/images/reset-random.png) ,
and
,
and !["[tell (grid) put_beeper]"](https://artofcomputing.cecs.anu.edu.au/images/tell-grid-put-beeper.png) ,
with the coordinates of one of the corners (for example, 11 and 1 is
the lower right corner). You can do this on the grid with hurdles
or without.
,
with the coordinates of one of the corners (for example, 11 and 1 is
the lower right corner). You can do this on the grid with hurdles
or without.
To Preserve your work for Lab 1 Make one xml file with the new blocks you made for excercises 1.1 - 1.3 (and only those blocks), save it somewhere on your computer – this way you can refer to them in future labs if you need to!
Assignment submission
There is no assignment to submit this week. The first assignment will be on lab 2, in which you will continue to teach Karel how to do more things.
Quick links
- Monday 1200-1300 (PSYC G8)
- Tuesday 1000-1100 (PSYC G8)
- Wednesday 1200-1300 (PSYC G8)